스프링 Legacy - Spring MVC 프로젝트 생성 후 프로젝트 설정
1. 프로젝트 설정
1-1) 프로젝트의 Java Build Path 에 Tomcat v8.5 추가

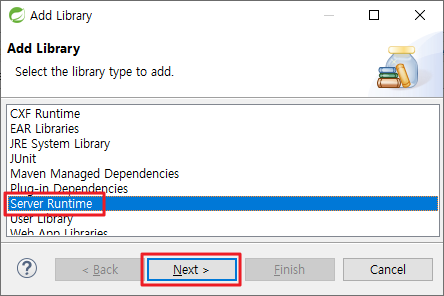
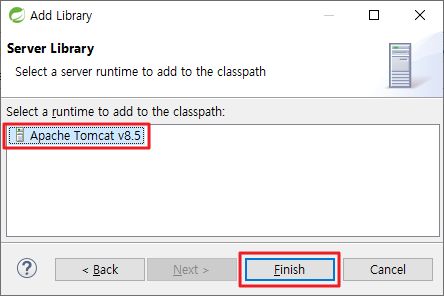
1-2) 프로젝트의 Project Facets 설정
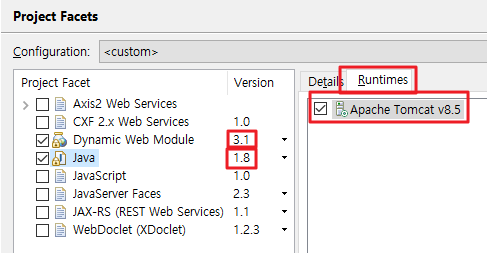
- 버전을 수정해준다. (Java 1.8/ Dynamic Web Module(Servlet) 3.1)
- Java Runtimes에 Apache Tomcat v8.5 추가
2. web.xml 수정
xsd 프로젝트 버전으로 수정

- xsd 3. 1버전으로 수정
상단에 security-context.xml 경로 추가
	<context-param>
		<param-name>contextConfigLocation</param-name>
		<param-value>
		/WEB-INF/spring/root-context.xml
		/WEB-INF/spring/security-context.xml
		</param-value>
	</context-param>
Encoding UTF-8 필터 추가
<!-- Filter -->
<!-- 한글 처리를 위한 UTF-8 필터 -->
<filter>
    <filter-name>encodingFilter</filter-name>
    <filter-class>org.springframework.web.filter.CharacterEncodingFilter</filter-class>
    <init-param>
        <param-name>encoding</param-name>
        <param-value>UTF-8</param-value>
    </init-param>
</filter>
<filter-mapping>
    <filter-name>encodingFilter</filter-name>
    <url-pattern>/*</url-pattern>
</filter-mapping>
3. Spring Security 라이브러리 설치 및 설정
3-1) pom.xml - Spring-Security 의존성 설정
<!-- 스프링 시큐리티를 웹에서 동작하도록 해준다. -->
<dependency>
    <groupId>org.springframework.security</groupId>
    <artifactId>spring-security-web</artifactId>
    <version>5.0.7.RELEASE</version>
</dependency>
<!-- 스프링 시큐리티 설정을 도와준다 -->
<dependency>
    <groupId>org.springframework.security</groupId>
    <artifactId>spring-security-config</artifactId>
    <version>5.0.7.RELEASE</version>
</dependency>
<!-- 스프링 시큐리티의 일반적인 기능을 사용하도록 도와준다. -->
<dependency>
    <groupId>org.springframework.security</groupId>
    <artifactId>spring-security-core</artifactId>
    <version>5.0.7.RELEASE</version>
</dependency>
<!-- 스프링 시큐리티와 태그 라이브러리를 연결해준다. -->
<dependency>
    <groupId>org.springframework.security</groupId>
    <artifactId>spring-security-taglibs</artifactId>
    <version>5.0.7.RELEASE</version>
</dependency>
3-2) web.xml - 스프링 시큐리티 필터 설정
서블릿 필터클래스를 서블릿 컨테이너 를 등록함
<!-- 서블릿 필터 클래스를 서블릿 컨테이너에 등록함 -->
<filter>
    <filter-name>springSecurityFilterChain</filter-name>
    <filter-class>org.springframework.web.filter.DelegatingFilterProxy</filter-class>
</filter>
<filter-mapping>
    <filter-name>springSecurityFilterChain</filter-name>
    <url-pattern>/*</url-pattern>
</filter-mapping>
4. security-context.xml 생성
4-1) web.xml - security-context.xml 경로 설정
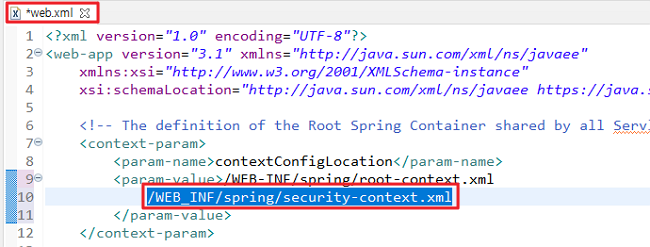
4-2) security-context.xml 파일 생성
Ctrl + N 눌러서 Wizard를 불러옵니다.

- 생성메뉴에서 Spring Bean Configuration File 선택
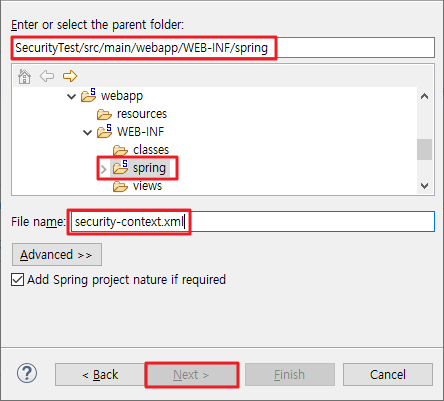
- 파일이름으로 앞서 설정한 "security-context.xml"로 지정합니다.
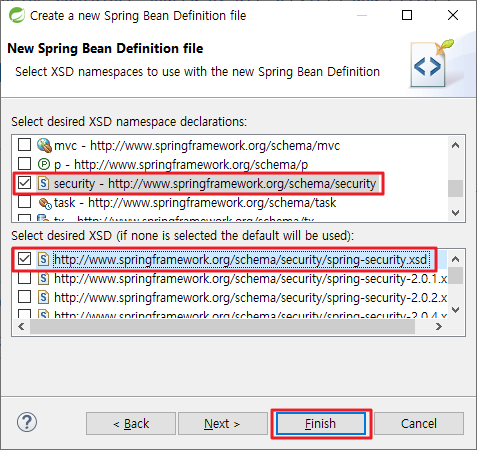
- XSD 네임스페이스는 security 기본 버전 으로 설정합니다.
'Spring' 카테고리의 다른 글
| [스프링시큐리티] 로그아웃 구현 (security-context.xml) (0) | 2023.07.04 |
|---|---|
| [스프링Security] 어노테이션 사용 설정 (0) | 2023.06.16 |
| [스프링Legacy] Mybatis 프레임워크 초기설정 (0) | 2023.06.01 |
| [스프링MVC] Form타입 Fileupload 방법 (commons-fileupload) (0) | 2023.05.24 |
| [스프링MVC] @RequestMapping 어노테이션 총 정리 (0) | 2023.05.23 |


댓글